Sizing .jpg images for NYCity News Service
Image size refers to the number of pixels, short for picture element, in your image. Each pixel is one byte or block of color information. Images are typically made up of millions of pixels of thousands of different colors that appear to blend together to give smooth tone. In the photo below the inset is an enlargement of the student’s necklace. You can see the pixels very clearly. Image size and image resolution are closely related. The more pixels, the greater the resolution and the larger the file size. The greater the resolution and larger the file size, the higher the image quality, meaning a sharper overall image and better color.
Image size is typically expressed by the number of pixels along both the horizontal and vertical edge of an image. For example 3800 x 2600. Even small point-and-shoot cameras are now capable of producing magazine quality image, images 2000 pixels or more along the longest edge (the horizontal edge if it’s a horizontal image, the vertical edge if it’s a vertical image. The shorter edge will vary proportionately). We often talk about image size in terms of the number of pixels along the longest edge. For example, you might say, “make the image 1000 pixels along the longest edge.” The shorter edge will be automatically size in proportion in Photoshop if you follow the steps below.
Computer screens require images of a much smaller size than do magazines or newspapers for good reproduction. For NYCity News Service IMAGES SHOULD BE 1000 PIXELS ALONG THE LONGEST EDGE.
Here’s how you size an image in Photoshop:
With the image open go to IMAGE in the menu at the top of the screen. Scroll down to IMAGE SIZE and the dialogue box below will appear. Type 1000 into the PIXEL DIMENSIONS field (note: the field might be set up to measure in inches or even centimeters. You can click on the up/down arrows to the immediate right of the field to change the measurement to pixels). The small chain link icon to the right of the field indicate that Photoshop will automatically change the shorter edge of the image proportionately. Don’t worry about any of the other field even if the numbers appear to change when you change the pixel dimensions. Remember the longest edge is the horizontal edge for a horizontal image and the vertical edge for a vertical image.
Change the number and then hit OK.
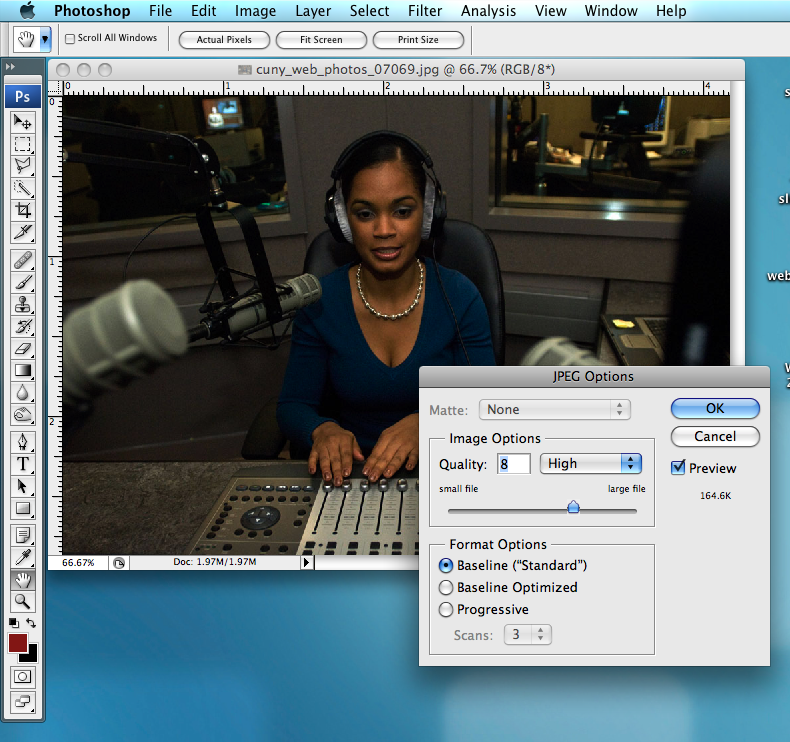
When sizing a .jpg in Photoshop you will also need to tell it how much you’d like the image to be compressed. As with audio files .jpg files are compressed when closed to make them more efficient to store and to send. The great the compression, the greater the loss of image quality. When you save a .jpg in Photoshop for the first time, you will get the dialogue box below.
Either change the number in the box or use the slider to select either high or maximum quality.
IMPORTANT NOTE: If you think you may someday want a version of your photo at a higher resolution for printing, you need to save a version of the image BEFORE you reduce the pixel dimensions. You can always make in image small in Photoshop but you can’t make it bigger. To do this go to SAVE AS under FILE in the menu before you resize. You can then create (and name a copy) of the image at the original resolution.


